|
|
WorldClock.Classic Description
|
|
WorldClock.Classic is an attractive and easy to use desktop time utility that includes timezone, timesync,
calendar, wallpaper and alarm features. Its primary purpose is to get the current local time for
any area of the world simply by clicking on a world map. It will automatically determine whether
Daylight Savings Time is in effect for the selected area and adjusts the time accordingly.
WorldClock.Classic can synchronize your computer's clock with one of the many 'Atomic Clocks' available on the
Internet. [1] You can also schedule TimeSyncs to occur at
pre-defined intervals or at a set time. And by using the WorldClock.Classic AutoTimeSync Service, this
scheduled TimeSync will occur even if WorldClock.Classic is not running.
WorldClock.Classic also gives you the ability to fully customize the Windows taskbar clock display.
In addition to displaying regular time and date information, it also allows you to display current
local weather conditions. [2]
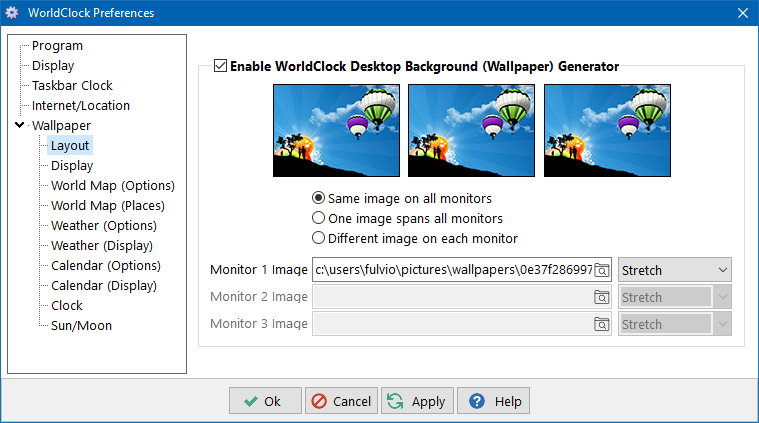
WorldClock.Classic also comes with several Windows wallpaper features that present a wide variety of very
useful information. These include: A high resolution day/night world map with the local times of
up to 32 selectable cities (four in trial version); an analog clock display with user configurable update
frequency; a one to three month calendar; and the current weather conditions for any selected city.
You can also set up to eight alarms active for any pattern of selected days. Alarms can be
configured to sound a user selectable media file or run an application.
WorldClock.Classic also has a very nice calendar that allows you to set important reminders (with
notification) and includes a global database of public holidays.
And finally, WorldClock.Classic can display a series of multiple clock windows that easily allows you to
keep track of the local times for a large number of cities.
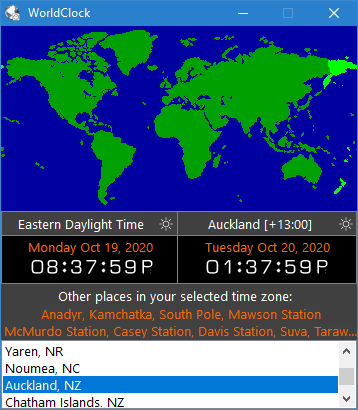
A screenshot of WorldClock.Classic's main window is shown below.

|
|
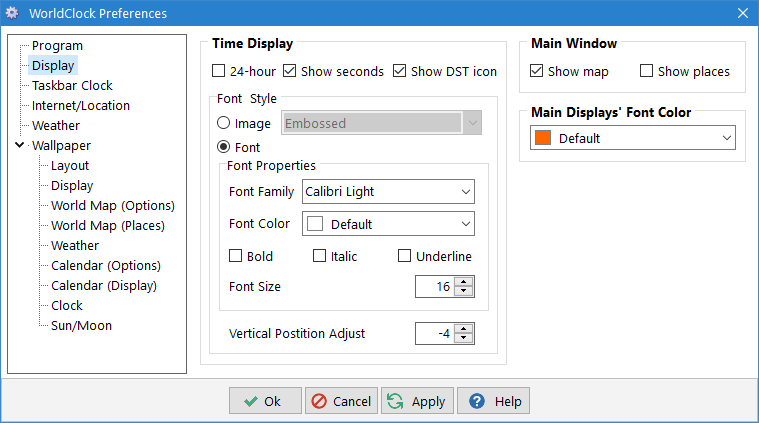
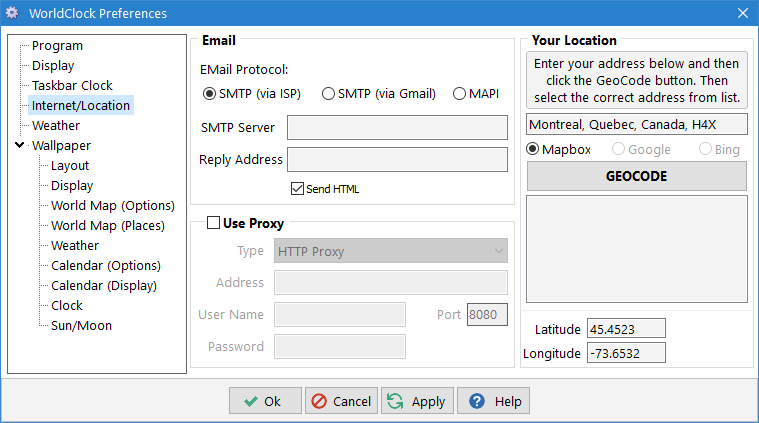
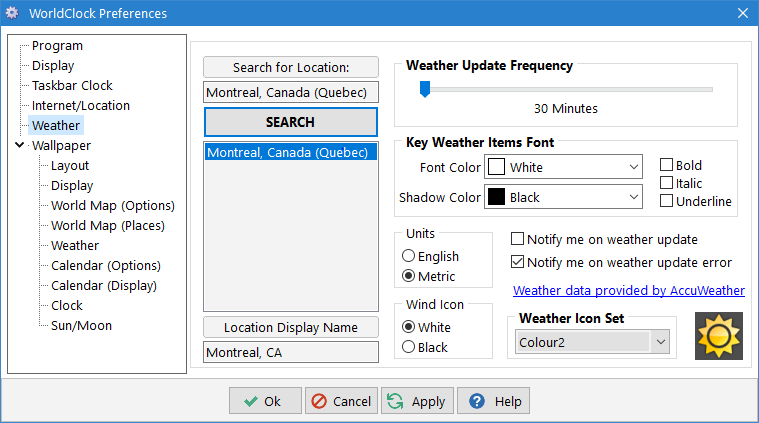
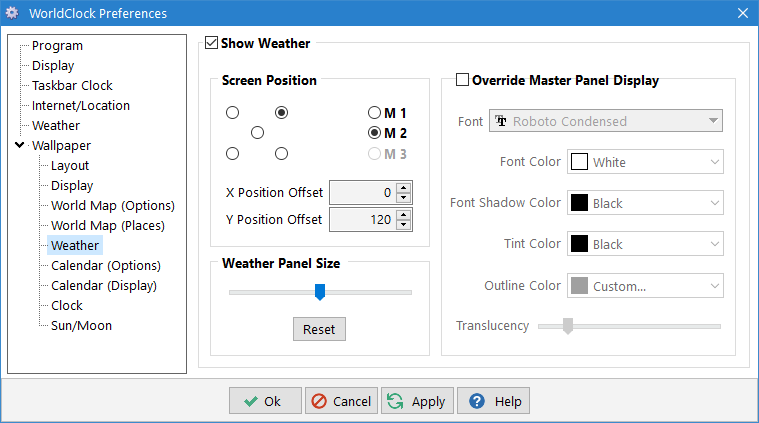
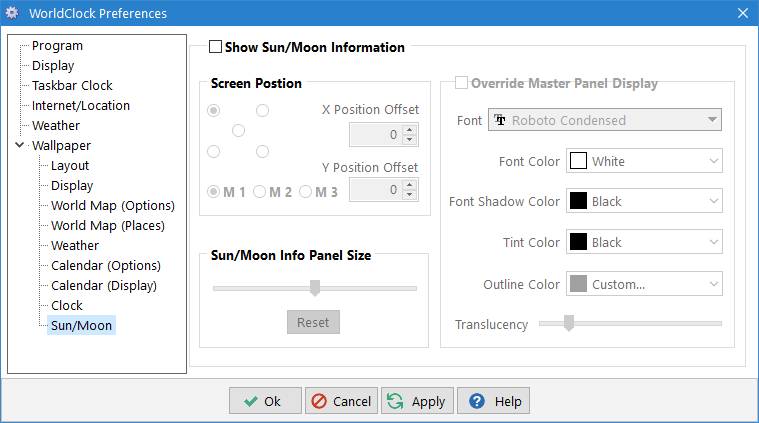
WorldClock.Classic Preferences
|
|
WorldClock.Classic is highly customizable. There are many options that allow you to make
WorldClock.Classic look and behave the way you want it to. All of WolrdClock's
configuration preferences are conveniently located together in a multi-page dialog
box as shown in the screen shots below.


|
|
WorldClock.Classic's TimeSync Utility
|
| One extremely useful WorldClock.Classic feature is its TimeSync capability.
You can check your computer's time against an Internet time server for accuracy.
It supports the SNTP time sync protocol and allows you to select a preferred
time server. You can also specify a maximum adjustment value -- if the time
adjustment is larger than your specified value, you are prompted for
confirmation before the clock is reset. This is very useful in case the time
server returns invalid data. Also note that the TimeSync feature fully supports
Socks 4, 4A, 5 proxies including Socks 5 proxy authentication.
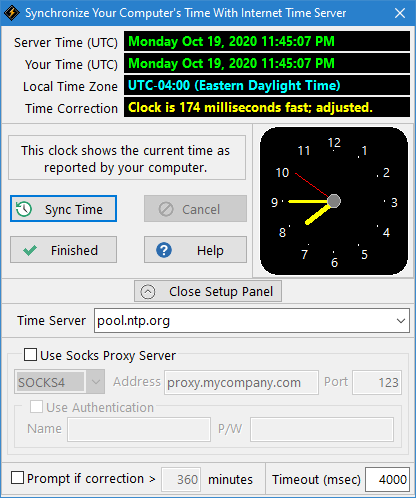
WorldClock.Classic will automatically reset your computer's clock if it finds a
difference. Note that this does not apply to the Trial Version which
will display the adjustment value but will not reset the clock.
|
|
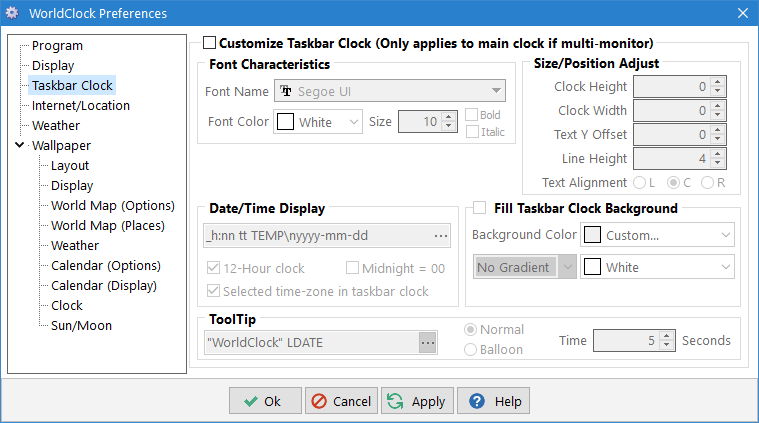
WorldClock.Classic's Taskbar Clock Customization Features [3]
|
 WorldClock.Classic allows you to completely customize the taskbar clock display in almost any way
you wish. You can set the date and time display format as well as the background
colours/gradient. You can also adjust the position and size of the taskbar clock. Note too that
you have the choice of displaying either the local time or the selected time zone's time in the
taskbar clock. The options for the displayed date/time are extensive and are controlled by a
user generated format string.
WorldClock.Classic allows you to completely customize the taskbar clock display in almost any way
you wish. You can set the date and time display format as well as the background
colours/gradient. You can also adjust the position and size of the taskbar clock. Note too that
you have the choice of displaying either the local time or the selected time zone's time in the
taskbar clock. The options for the displayed date/time are extensive and are controlled by a
user generated format string.
The format string for the time display in the image above would be:
_h:nn tt (TEMP, COND)\ndddd mmmm dd
This Taskbar Clock Display Format String that you create in the Preferences screen is the heart
of the date/time display control. You construct a string of 'elements' that tells WorldClock.Classic
what to display. The following table lists some of these elements:
| yyyy |
Year with century |
| yy |
Year without century |
| mm |
Month number (e.g. January -> 01) |
| m |
Month number, no leading zero (e.g. January -> 1, December -> 12) |
| mmmm |
Full month name (depends on control panel Region setting) |
| mmm |
Abbreviated month name (depends on control panel Region setting) |
| mme |
Abbreviated month name in English (useful in a non-English locale) |
| dd |
Day of month |
| d |
Day of month, no leading zero |
| dddd |
Full weekday name (depends on control panel Region setting) |
| ddd |
Abbreviated weekday name (depends on control panel Region setting) |
| dde |
Abbreviated weekday name in English (useful in a non-English locale) |
| hh |
Hour |
| h |
Hour, no leading zero |
| nn |
Minute |
| n |
Minute, no leading zero |
| ss |
Second |
| s |
Second, no leading zero |
| ww |
Week number (ISO 8601 standard) |
| w |
Week number, no leading zero (ISO 8601 standard) |
| tt |
AM/PM indicator, follows setting of "AM Symbol" or "PM Symbol" |
| / |
Date separator (depends on control panel Region setting) |
| : |
Time separator (depends on control panel Region setting) |
| \n |
New line |
| LDATE |
Show long-formatted date (depends on control panel Region setting) |
| DATE |
Show short-formatted date (depends on control panel Region setting) |
| TIME |
Show time (depends on control panel Region setting) |
| TEMP |
Display current temperature (applied on next weather update) |
| COND |
Display current weather conditions (applied on next weather update) |
| WIND |
Display current wind conditions (applied on next weather update) |
| CITY |
Display weather info's selected city |
| "..." |
Display literal text surrounded by double quotation marks |
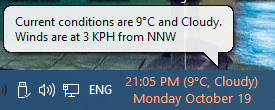 You also have control over the popup tooltip that is displayed when you hover your mouse over the
taskbar clock display. The same elements as above are available for the construction of the tooltip
format string.
You also have control over the popup tooltip that is displayed when you hover your mouse over the
taskbar clock display. The same elements as above are available for the construction of the tooltip
format string.
When used in conjunction with the Weather feature, this can be a useful way of
keeping track of the current weather as shown in the image above. (Note that you need not have
the weather wallpaper feature active in order to have the taskbar clock display weather
information. Worldclock.Classic will update the weather info even if the weather wallpaper is disabled.)
The format string for the tooltip in the image above would be:
"Current conditions are" TEMP "and" COND.\n"Winds are at" WIND.
You can also control the length of time (in seconds) the tooltip is displayed.
NOTE: Due to Microsoft's overhaul of the taskbar on Windows 11, the taskbar clock customization
feature will no longer be available if you are on Windows 11 or higher. However, this feature will
continue to be available if you are on Windows 10 or earlier. Also note that there are several
third-party programs that can restore the Windows 10 taskbar functionality under Windows 11.
Should you be using one of these programs, WorldClock.Classic's taskbar clock customization feature will
also be available under Windows 11.
|
|
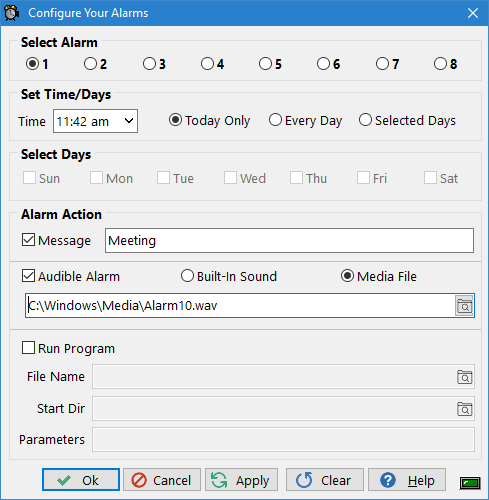
WorldClock.Classic's Alarms
|
| You can also set up to eight alarms. These can be set for a given time and activated for the current
day only or for selected days that you specify.
|
| When an alarm triggers, you will receive a message such as the following:

|
| You can also specify whether an audible alarm sounds when the alarm goes off. You can choose from
either the built-in alarm sound or any media file of your choice.
|
|
|
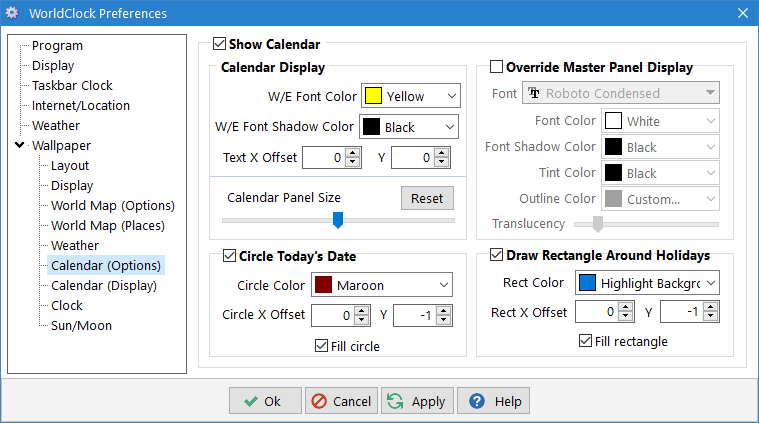
WorldClock.Classic's Calendar Features
|
 WorldClock.Classic also includes a very nice calendar that includes a global database of public holidays.
You can easily keep track of important dates by 'marking' the calendar for
special days to remember such as birthdays, anniversaries, and celebrations.
You can also choose to receive an alert when any of these dates arrive. The
alert can be text-only, or text and sound (either WorldClock.Classic's built-in sound
or a media file of your choice). You can also configure the time that the alert
is delivered.
|
| WorldClock.Classic has
another calendar feature that is quite handy. It can overlay the calendar
for the current month, as well as previous and next months, onto your
desktop's wallpaper. This will work for whatever wallpaper you choose and will
automatically adjust to any new wallpaper you select.
|
| You can configure the
wallpaper calendar in several ways including size, font type, font colour, what
side of the screen on which it is to be displayed, and whether to display the
three months all in a line or 'tucked' into the corner of the screen. You also
have the option to draw a circle around today's date as well as an option to
draw a rectangle around public holidays.
|
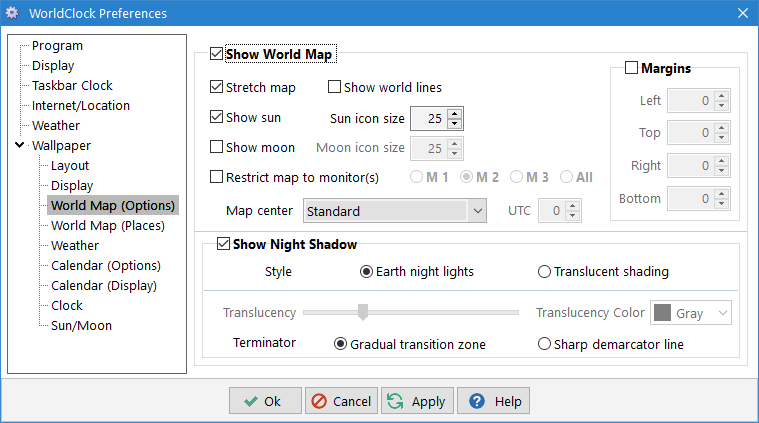
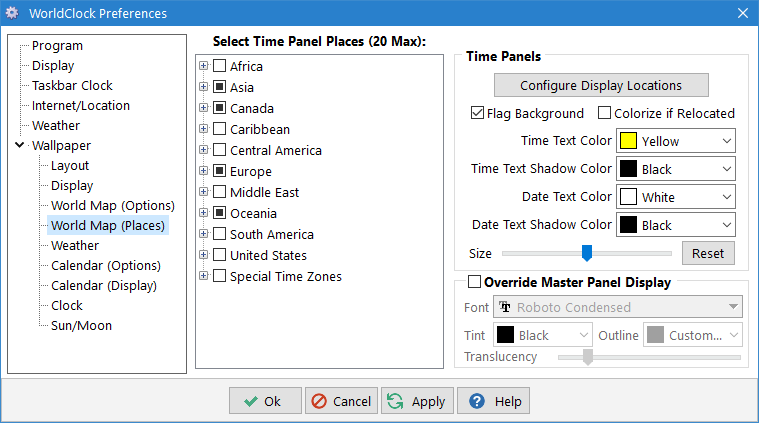
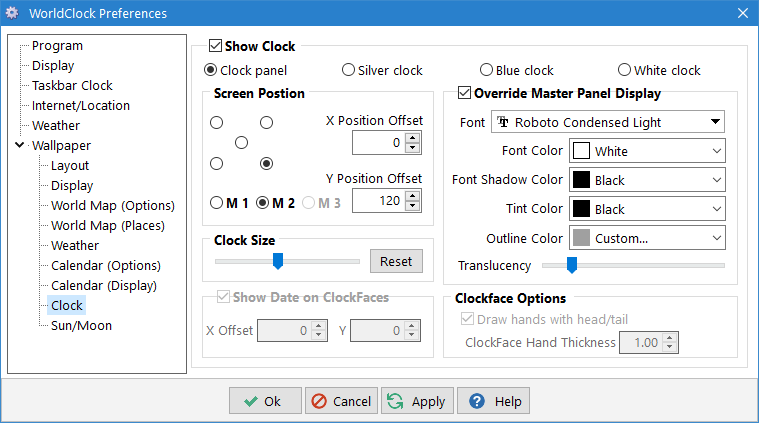
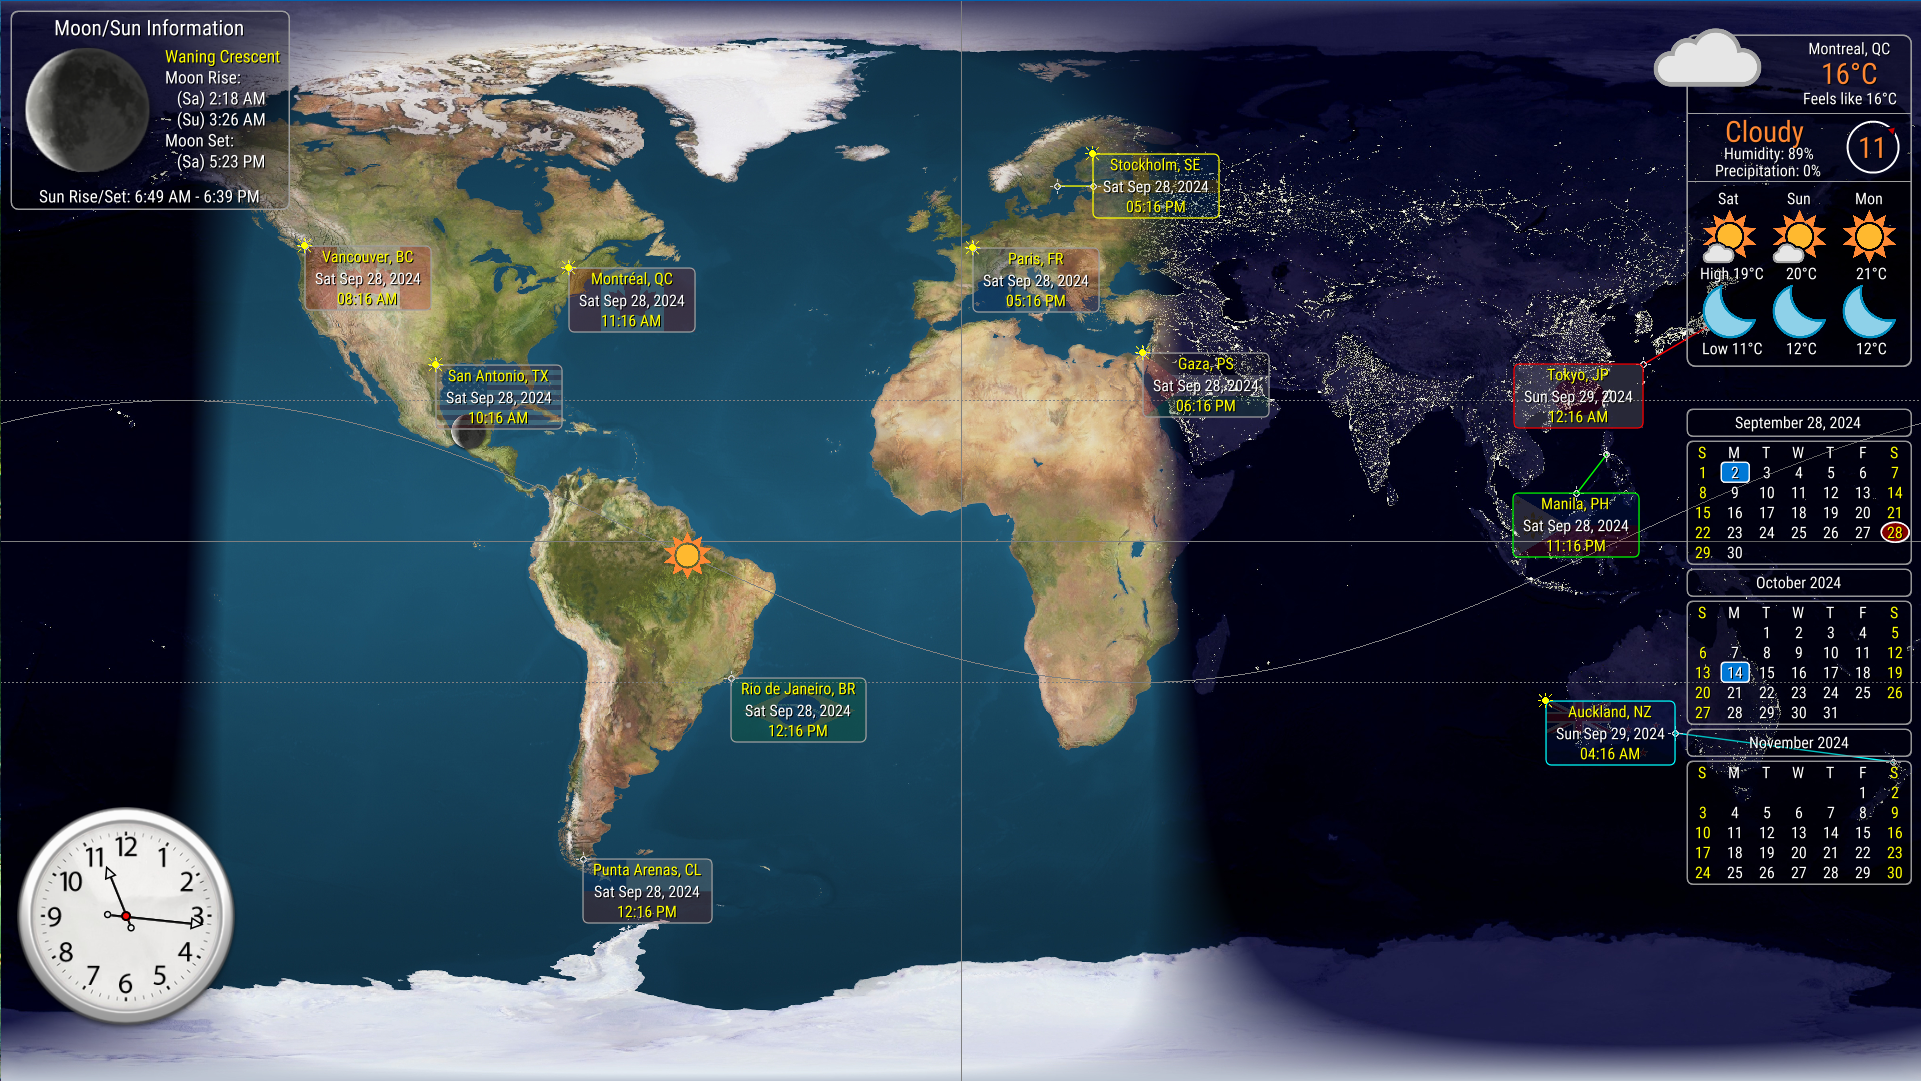
| WorldClock.Classic has a second wallpaper feature that will create a wallpaper image
displaying a high resolution map of the world. The day and night areas
of the world are clearly shown on the map. You can also have the local
date/time of up to 32 locations (4 in the trial version) displayed on
panels overlaying the map. You can also have a clock (analog or digital)
displaying your current date/time.
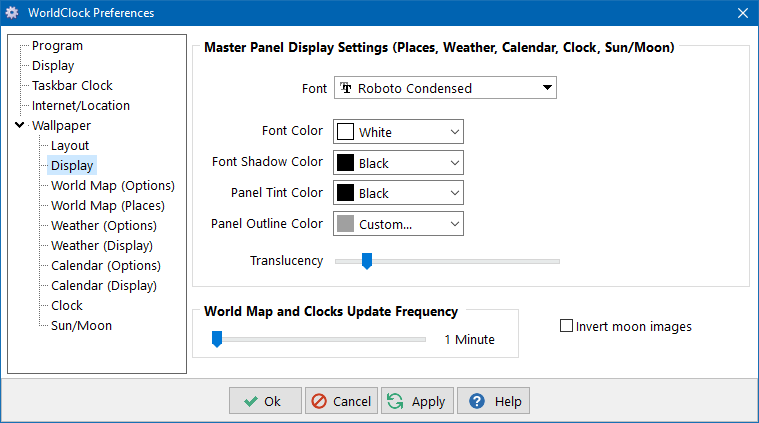
The world map wallpaper can also be configured to display the night area
using a satellite composite image of the Earth's surface at night. The day area uses the
regular map while the night area uses a 'Night Lights' map. These 'Night Lights' are,
of course, night illumination from our major metropolitan areas (street lighting,
electric signs, etc.) which are clearly visible from space. (The screen shot above shows
what this feature looks like.)
Your wallpaper will be regenerated according to your selected update frequency to reflect
the current position of the shadow area and the current time on the time panels. If you
have opted to display the clock as well, it too will be updated.
|
WorldClock.Classic Wallpaper Image Using Typical Settings
|
|
Using WorldClock.Classic & Other Miscellaneous Features
|
 The time display on WorldClock.Classic's main window is broken
down into two panes. The pane on the left shows you your local time, while the
pane on the right shows you the current time in the zone you have selected. The
time display has header bars to display the name of the selected areas. For your
local time, it displays what Windows reports as your local time zone. You can
customize the typically bland nature of this information (i.e. 'Eastern
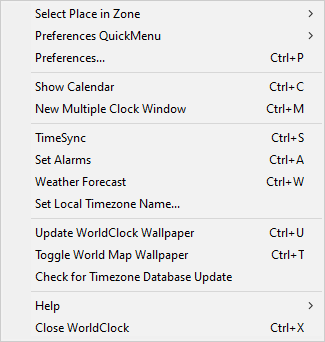
Standard Time') with your own text. You do this by selecting the 'Set Local
Timezone Name' option from the popup menu (see image on the right).
This allows you to personalize the display
to reflect something a little more meaningful (i.e. 'Montreal, Quebec').
The time display on WorldClock.Classic's main window is broken
down into two panes. The pane on the left shows you your local time, while the
pane on the right shows you the current time in the zone you have selected. The
time display has header bars to display the name of the selected areas. For your
local time, it displays what Windows reports as your local time zone. You can
customize the typically bland nature of this information (i.e. 'Eastern
Standard Time') with your own text. You do this by selecting the 'Set Local
Timezone Name' option from the popup menu (see image on the right).
This allows you to personalize the display
to reflect something a little more meaningful (i.e. 'Montreal, Quebec').
If you don't like my choice of font or colour for the time display, you have the
option of changing it. Simply select the 'Set Time Display' option from the popup
menu and you can select from several different choices. If you only want to see the
hours and minutes in the time display, simply turn off the 'Show Seconds' option in
the Preferences.
If you minimize the WorldClock.Classic program, the program name on the Windows
taskbar changes from 'WorldClock' to display the current location and
time of your selected zone. You also have the option of minimizing
WorldClock.Classic to the System Tray. Note that if you choose this option,
you will lose the taskbar display of the selected area's current time.
However, if you move the mouse over the WorldClock.Classic icon in the tray
area, a hint window will popup to display this time. You can also
choose to start your program already minimized.
When you run WorldClock.Classic, the main window presents you with a map of the world.
You can click anywhere on the map to select that area's time zone. You will see
the selected zone time display (the right pane) update to reflect the UTC hour
shift as well as the local time in your selected zone. Alternately, you can
select an area/city in the listbox at the bottom of the screen. As stated
previously, the program takes into account whether or not DST is in effect in
the selected time zone. If so, you will see a little 'sun' icon appear just to
the right of the time zone display. You will also notice that once you have
select a time zone, the 'Select Place in Zone' popup menu item (the popup menu
is shown above) is filled in with all of the places associated with that
specific time zone.
Right-clicking anywhere on the WorldClock.Classic window will bring up the popup menu.
Using the 'Preferences' item on this menu you can select various options such
as whether or not to show the map and/or places segments of the WorldClock.Classic
window. This can be handy when you want to park WorldClock.Classic in a small corner
of your screen and take up as little space as possible. Note that there is
also a 'Stay On Top' option in the Preferences menu. As the name implies, this
option will force the WorldClock.Classic window to always remain above your other
windows.
Selecting the 'Set Clock' option from the menu (or double clicking on either
time display) will bring up the TimeSync
screen. Press the Check Time button on this screen to validate your computer's
clock against your selected Internet Time Server. Note that you are not
limited to my list of selected time servers. You can also enter your own
server address if you so choose. You can also ask WorldClock.Classic
to set your's computer's clock at pre-set intervals. Select the 'AutoTimeSync'
option from the Preferences and you can choose an hourly interval or specific time
when to perform a time sync. If you wish to run the program just to set the clock and then exit,
there is a '/s' command line option to do this.
You can also check for, and automatically download, any updates to WorldClock.Classic's
timezone database by selecting the 'Check for Timezone Database Update'
option from the menu.
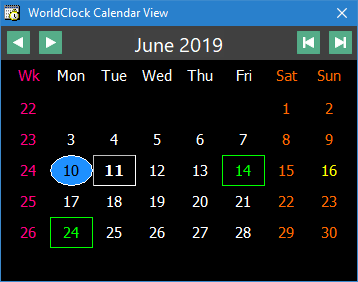
You will note that if you move your mouse over the date areas, the dates turn
into buttons. Press either of these buttons and a
calendar will popup on the side of the main screen. You can move the
calendar display around by clicking and dragging while your mouse is over the
month name. You can close the calendar display by clicking on the little 'x'
at the lower right-hand corner of the calendar screen. (You can also bring up
the calendar screen by selecting the 'Show Calendar' option from the popup
menu.)
Once the calendar screen is up, you will note that there are two sets of
buttons at the top of the calendar. The set on the left allows you to scroll
the calendar through the months, while the set on the right allows you to
scroll the calendar through the years. If you right click while your mouse is
over the calendar area of the calendar screen, you will get a popup menu that
allows you to select various options for the calendar. The main use for this
menu is to set/reset your 'marked' days. Note that you can mark a day for the
current year, or for all years. For instance, if you want to mark an upcoming
event (concert, date, whatever) you would only mark for the current year.
Birthday reminders, on the other hand, you would want to mark for all years.
You also have the ability to make all of the main WorldClock.Classic windows 'translucent'.
This is very useful if you've set up WorldClock.Classic for 'Stay-on-Top' operation
but find that it gets in the way of viewing your active application. With this
translucency feature, you can still see your document (or whatever program is
currently running) under the WorldClock.Classic window. You have full control over the
level of translucency varying from almost fully translucent to fully opaque.
|
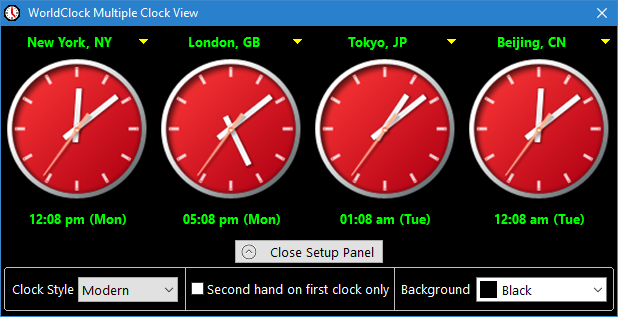 Another very handy feature is the multiple clock display. Select the
'New Multiple Clock Window' item in the popup menu to open this window.
Here, you have access to four independent clocks that display the times in four
separately configurable areas of the world. Simply click on the little
down-arrow button on any of the clocks to select a new location. A list
will popup from which you can select a new location. Note that this
list is identical to the location list on the main display.
Another very handy feature is the multiple clock display. Select the
'New Multiple Clock Window' item in the popup menu to open this window.
Here, you have access to four independent clocks that display the times in four
separately configurable areas of the world. Simply click on the little
down-arrow button on any of the clocks to select a new location. A list
will popup from which you can select a new location. Note that this
list is identical to the location list on the main display.
|
|
|
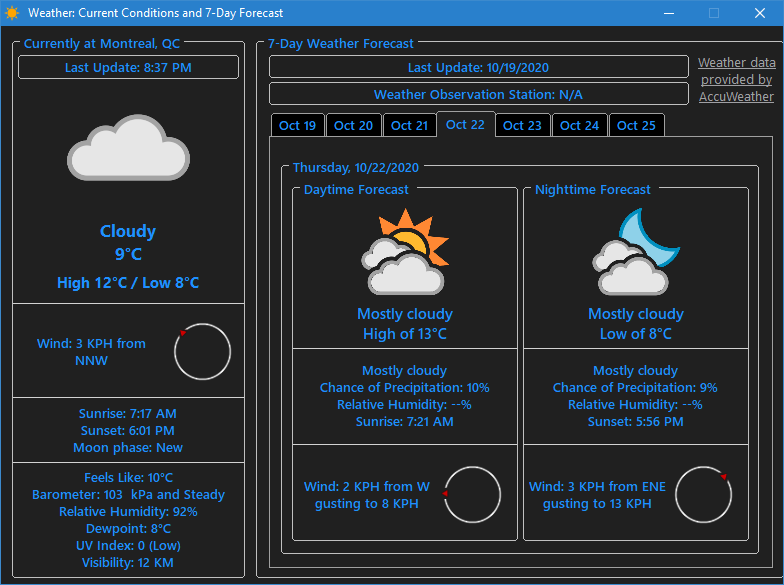 And finally, a very nice weather forecast display is also available; select the
'Weather Forecast' item in the popup menu to open this window.
Here, you have a detailed description of today's weather along with separate day and
night forecasts for coming days.
And finally, a very nice weather forecast display is also available; select the
'Weather Forecast' item in the popup menu to open this window.
Here, you have a detailed description of today's weather along with separate day and
night forecasts for coming days.
|
| 1 The trial version of WorldClock.Classic will not reset your clock; it will simply report the time adjustment value. |
| 2 Taskbar customization features are not available under Windows 11. |
| 3 Taskbar customization features are not available under Windows 11. |
|
| Copyright © 2020-2025 Fulvio Castelli |
|
|
